Table of Contents
Filed under Forex Strategy Builder - Overview » Articles and Tutorials
Guide to Forex Strategy Builder
This guide follows the main steps of building and testing Forex strategies.
It is important to make it clear from the very beginning that what we are discussing here is pure technical analysis (technical indicators, logical conditions, charts etc.) applied in a mechanical trading system. To put it in a nutshell, a strategy's rules are strictly determined and Forex Strategy Builder applies the exact rules we have initially set. For example, we cannot set rules like “Long entrance slightly above Moving Average”; instead we need to specify: “Open a long position 5 pips above Moving Average”.
Introduction
When first started, Forex Strategy Builder loads the default strategy New.xml with the historical market data for the strategy, calculates the test and displays the information in charts and tables. The program recalculates the test every time a change in some of the elements is made which may affect its results. For example, if we change the symbol of the instrument, the data period or some of the indicators, Forex Strategy Builder will immediately perform the necessary calculations and show the due charts. This means that we always have loaded data and a calculated strategy available. There is no need to press a button to make the program calculate the strategy. It does it automatically.
As a whole, the logic of the strategy is determined by the technical indicators, which are situated in the indicator slots. Those are the rectangular slots in the central part of the screen:?:. You can change the strategy by changing the indicators, the rules for their application or their parameters. You can also add new slots or delete existing ones.
We need to pay special attention to two main points:
Firstly, note that only the logic for the long positions is input in the indicator slots. You don't need (and you are not able) to input the logic for the short positions. Forex Strategy Builder does it automatically. For example, if you want to open a long position when the market price has reached the upper Bollinger Band and a short one at the lower band, it is enough to choose Bollinger Bands with “Enter long at the Upper Band” logic. This is sufficient for the program to perform the requested logic in both directions. Forex Strategy Builder always performs what we have set in the long position slots and automatically determines the mirror logic for the short position.
Secondly, note that the slots are of different types and each indicator performs specific tasks depending on the slot it is placed in.
On the whole, there are four types of slots:
- Opening Point of the Position - this is where the price of opening new positions is determined. Therefore, only indicators which show price can be placed here. Such indicators are Moving Average, Bollinger Bands, Donchian Channel. Indicators such as RSI, for example, cannot be placed here because RSI does not determine a price at which a position can be opened.
- Opening Logic Condition - these slots present logical conditions, all of which must be fulfilled in order to open a position in a given direction. For example, if we place here the Momentum indicator and specify the “Momentum rises” logic, the strategy will allow us to enter a long position only when the Momentum indicator rises, and a short one when the Momentum indicator falls.
- Closing Point of the Position - this is where indicators which determine the price of closing a position are placed. Again, only indicators which determine concrete price can be placed here.
- Closing Logic Condition - these slots are available only if the slot Closing Point of the Position contains a Bar Closing indicator. Their function is to close a position if any of the logical conditions specified in them has been fulfilled. These slots can be one or two. If at least one of their logical conditions is fulfilled, the position will close. This is different from “Opening Logic Conditions” where it is obligatory that all conditions are fulfilled at the same time.
Demo Strategies
It is recommended that at the beginning you look through the demo strategies available with the program. They can be opened from the File → Open menu. Each demo strategy comes with a description. To be able to see it, press the small icon with the i symbol on it. To have a more detailed examination of the strategy, the logical conditions and the test statistics, use the Overview function. These strategies are also available in the website of the program - Forex Strategies. There you can make comments on them.
If you need other examples, specially customized for your financial instrument and period, you can use the automatic Strategy Generator to build new strategies. After you have generated an interesting strategy, have a look at its description (the Overview function). Forex Strategy Builder generates it automatically for you.
Account Settings
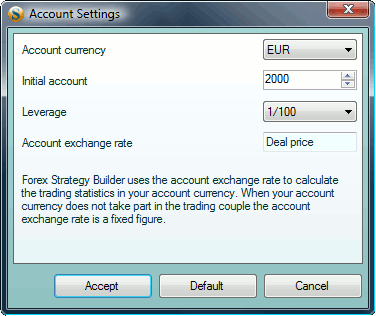
Here we start to prepare Forex Strategy Builder for the process of strategy testing. In order to achieve maximally real results, we need to input the parameters of our forex account using the Account Settings dialogue window (Menu Account → Account Settings).
For the purpose of the present lesson, we will input the following parameters:
- Account currency: EUR;
- Initial account value: 2000 EUR;
- Leverage: 1/100.
The Account exchange rate parameter is used to recalculate the results from the test in the currency of your account. This parameter comes useful in the cases when the trading results are in a currency different from that of your account.
For example, if you are trading the EURUSD currency pair, the trading results are in USD. Forex Strategy Builder uses the current price of the deal in order to convert your profit or loss into EUR. If, however, you are trading USDCHF, the trading results are in CHF. Since your account is in EUR, you need to input the EURCHF exchange rate to enable Forex Strategy Builder to add the results of your trading to your account. In this case, the Account exchange rate parameter is a fixed figure, which is used for all calculations.
So far we are going to keep this parameter unchanged.
Choosing the Market
The next step is to choose the market at which our strategy is aimed. This is, in fact, a choice of the financial instrument and the period of the chart which we are going to use.
Instrument Settings
In order to learn how to set new instruments when working with Forex Strategy Builder, we will use the currency pair GBPJPY. It is not included by default in the program but this does not present a big problem.
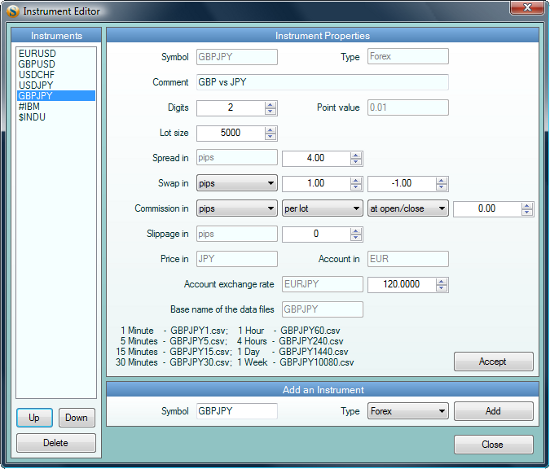
Setting and adding of financial instruments is done in the Instrument Editor dialogue window (Menu Market → Edit Instruments).
To add a new instrument, we use the Add an Instrument slot.
Input the symbol of the currency pair GBPJPY, the type of the instrument Forex and press the Add button. This operation helps to add the chosen currency pair to the symbols in the lefthand Instruments slot, as well as to load the default parameters in the Instrument Properties panel. Those parameters need further setting in order to meet the requirements of your broker. We will take the following values, which only serve the present example:
- Number of digits after the decimal point: 2;
- Size of a single lot: 5000 GBP;
- Spread: 4 pips;
- Swap numbers for short and long positions: 1,00 and -1,00;
- commission: 0 (Normally, currency is traded without commission.);
- Slippage: 0 (For fast markets a slippage of a few pips can be introduced);
- Account exchange rate: 120.00 (This is an average value of the price of EURJPY for the last three years.)
To validate the settings, we need to press the Accept button. The new currency pair will appear on the menu containing the symbols of the program after we have closed the current window. This, however, is not the last step. We need to provide historical data for the test.
Downloading Historical Data
On installation, Forex Strategy Builder contains a limited amount of historical data. It is stored in the Data folder in the main directory of the program. The data is kept in text files with the CSV extension. Forex Strategy Builder does not update the data automatically. We need to do that manually.
The easiest way to do that is to use the MetaTrader program. We will not look into this process in detail here. Detailed instructions for downloading data are available in the help section of the programe and the forum offers extensive discussions on the topic.
In a nutshell, open the MetaTrader and choose the GBPJPY chart with a day's period. Press the „Home” button several times to go back over the chart. Thus, MetaTrader downloads older data. Then, using the File → Save As menu, save the data file GBPJPY1440.csv in Forex Strategy Builder's Data folder. If you are not able to do that at the moment, you can continue this lesson using another instrument, USDJPY for example. This currency pair is included in the installation of the program .
Money Management and Protection
Strategy
Entry Point
Directions
Adding / Reducing Rules
Exit Point
Analysis
Statistics
Graphics
Strategy Overview
Improvement
Optimization


